If you often use Microsoft Office products, you’d probably agree with me that Word in particular suffers from a bad implementation of dark mode throughout the suites. I detest reading white text on a dark backdrop, let alone writing on it, with the possible exception of weary eyes at night. Its concept is simply absurd during the day, and the poorly designed functionality isn’t helping matters either. Thankfully, Word offers a built-in option to turn off dark mode, much like other Office suites. Therefore, you’ll find this article useful to disable dark mode if it is automatically activated on your Word program and your dislike its feel and appearance.
How to Disable Dark Mode on Word
There are two ways to disable Word document black. The first way lets you turn off the function just on your present device, whilst the second turn it off on all of the devices connected to your Microsoft account. We’ll go through the first option first as I’m willing to guess that you want to disable dark mode in Word for only one PC.
How to Turn Off Dark Mode on Your Current Device
This approach is hassle-free and simple to use. Follow these steps:
- Activate Microsoft Word.
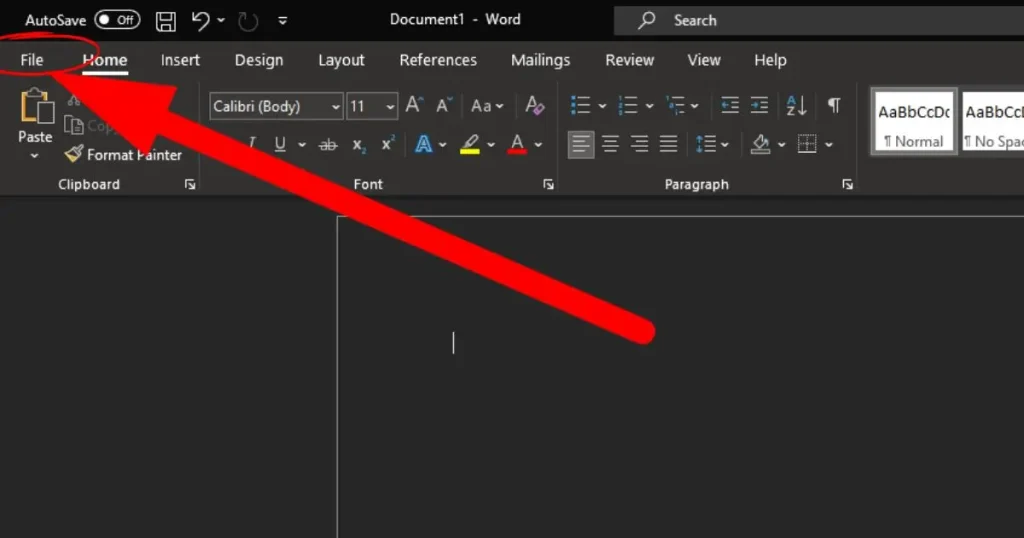
- In the top menu, select the File tab.
- Click Options in the left pane’s bottom navigation area.
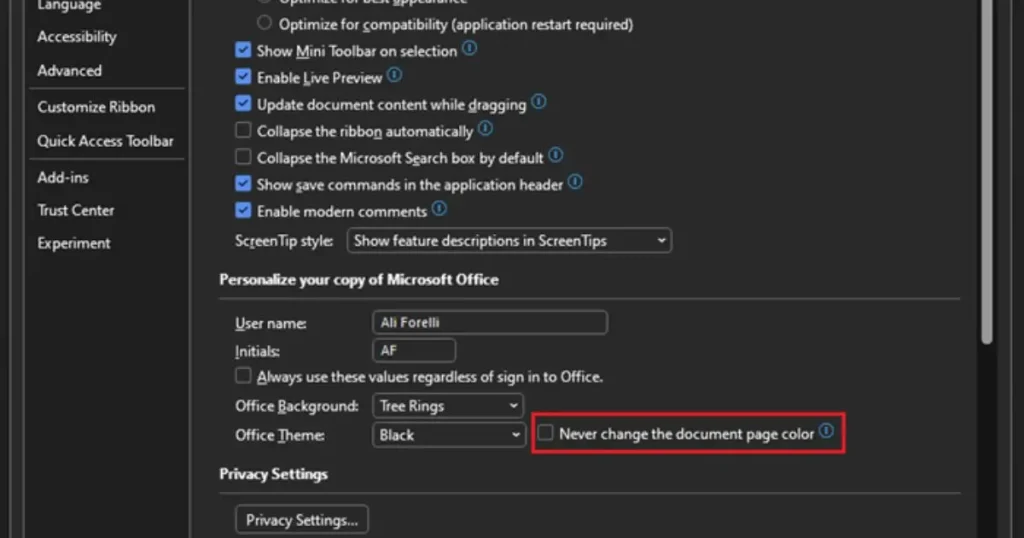
- You’ll be in the Word Options box now. To guide access the drop-down menu next to Office Theme, move down to the General tab.
- Select either Classic or Colorful after clicking the drop-down menu.
- To save all changes, click OK.
Disabling Dark Mode on your Microsoft account
By using this technique, dark mode will be turned off on your present device as well as any other devices that are now using your Microsoft account. As a result, when Word disables dark mode, you’ll see the changes on any other device you own.
Follow these steps:
- Activate Microsoft Word
- Scroll down to the left pane’s bottom by clicking File in the top menu.
- Select your Account.
- Scroll down a little to the drop-down selection under “Office Theme” in the Accounts menu.
- Choose Classic or Colorful by clicking the drop-down menu.
Change Word to Light Mode
The light theme/mode is used by the majority of images on PC interfaces and applications to display content because it resembles the appearance of ink on paper and makes text easier to read than other themes. Positive contrast polarity, commonly referred to as Light Mode, is the standard black text on a white backdrop. This option makes it considerably simpler for you to ensure accuracy if you have normal eyesight or are in a bright area. Since there will be more light on a light background, your pupils won’t need to dilate as much to let in more light, making it simpler for your eyes to understand the information.
You may alter the appearance of all your Office applications by changing the Office Theme or backdrop. By default, the Office apps (including Word) are set to “use system settings” (the Windows theme) or “Colorful”. As we previously discussed, when you change the theme of one of the Office applications, your new theme is instantly applied to the whole suite of apps. These procedures should be followed to switch Microsoft Word’s theme to the “White” theme (light mode):
1. Switch to Light Mode from Account Settings
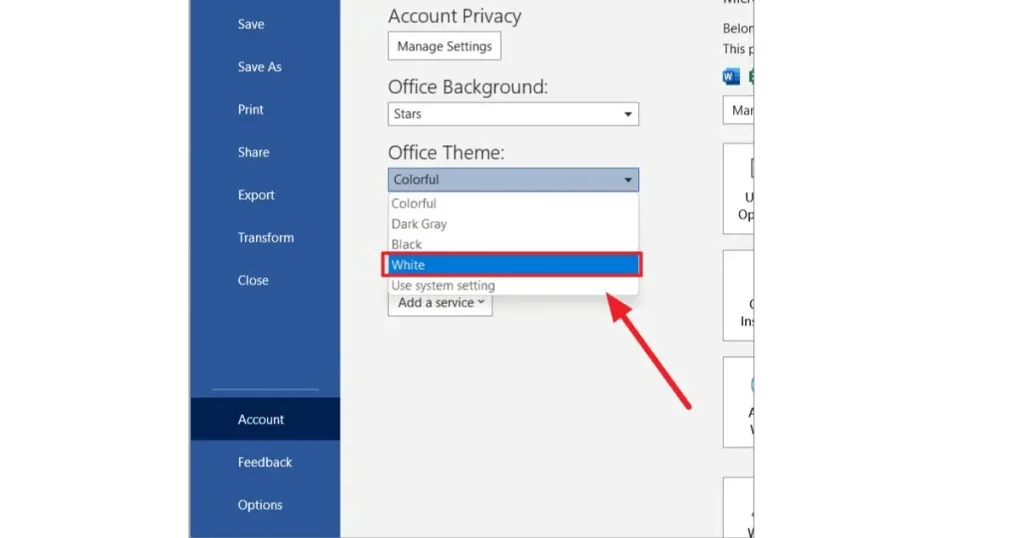
- On the left side of the Word Backstage view, click “Account.”
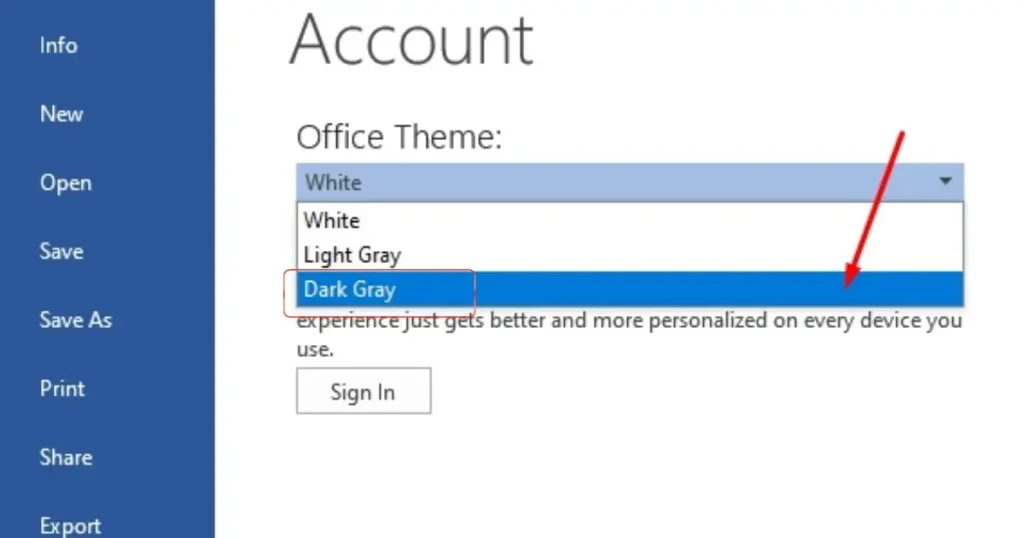
- Choose the desired theme from the list of options under “Office Theme” on the Account page: Black, Dark Gray, Colorful, or White. We’re using the “White” theme since we want the light mode.
- As you can see, everything is now white, including the title bar, ribbon, canvas, and borders (light mode).
- To be quite honest, there isn’t much of a difference between the default “Colorful” theme and the white theme. The ribbon and window under the “Colorful” theme would be light-grey (almost white), while the title bar would be blue. Everything would be white in color for the “White” theme.
- When the theme is changed to “Dark Grey” or “Black,” the app’s look really changes (Dark Mode).
2. Switch to Light Mode from Word Options Screen
- After starting Microsoft Word, select the ‘File’ option from the Ribbon menu. Then, in the backstage view, click the word “Options” at the bottom of the left panel.
- You’ll see the Word Options box. On the right, under “Personalize your copy of Microsoft Office,” make sure the “General” tab is chosen in the left pane.
- Select “White” for light mode from the drop-down option next to “Office Theme” under the “Personalize your copy of Microsoft Office” section. Click “OK” to apply after that.
3. Try the Dark Grey Theme too
Let’s check out how Word’s “Dark Grey” theme seems. To accomplish that, simply follow the directions above and select the “Dark Grey” theme from the “Office Theme” drop-down. The Dark Grey theme of the Word looks like this.
How to Enable Dark Mode in Word
MS Word’s stark white tone might strain your eyes and harm your retinas if you’re a night owl who frequently stays up late working on your Word documents. Microsoft Office released a new black theme to solve this problem (dark mode). The dark mode helps lessen eye strain and adjust light sensitivity for those with cataracts and associated diseases, as well as for those who operate in low-light conditions. The dark mode is more attractive and appealing than the light mode since it allows you to read and write in white letters on a dark backdrop. Additionally, selecting Dark mode might help you save battery life, especially if your screen is OLED.
The previous version had a dark mode as well, but it only altered the toolbars and ribbon’s appearance; the writing canvas remained completely white. But with the new Dark Mode, the document canvas is also covered in the dark theme. Unfortunately, Microsoft 365 is the only platform that supports this all-black look.